Forgejo Pages Server for an Onion-Only Forgejo Instance
TLDR: You can set up a Forgejo Pages server (in combination with a Forgejo server) to allow users to host their own static web pages easily.
Let us forge a system designed for hosting simple websites, one that incorporates further functionality within a dedicated space. An approach where users can facilitate the creation and distribution of their own ready-to-view web content without requiring considerable technical expertise. Enter Forgejo Pages.
Initial setup
The administrator of the Forgejo instance needs to configure the Pages server and an Nginx server. We will utilize Docker for the pages server. Ideally, the existing Forgejo infrastructure should already be complete based on the content provided in the anonymous Forgejo blogpost. If you're deploying this setup using Whonix, please consult the Docker on Whonix post for further guidelines.
Docker configuration
Execute the git clone command using the provided URL.
git clone https://github.com/Ronmi/forgejo-pages
Ensure that you have installed the Golang toolchain (golang package on Debian). Begin the process of building the Pages server. Please refer to the README within the project's folder for detailed guidance concerning compilation.
$ sudo apt install -y golang
$ cd forgejo-pages
$ go build
Proceed with building the Docker image. We will utilize the git.dockerfile file. That file relies upon a regular Debian image; meanwhile, the Dockerfile file uses a prebuilt image. It's more trustworthy to use a regular Linux image and customize it for our needs, rather than use a pre-configured image. Such a process demands little further exertion at present, given that git.dockerfile harbors everything necessary.
$ docker build -t forgejo-pages -f git.dockerfile --network=host --load .
If you're using Whonix to run the Pages server, utilizing --network=host effectively enables network connections for the building process. The default bridge network will often present issues for the build process. If you are not using Whonix (consider utilizing it nonetheless), you can eliminate the option flag --network=host; its importance lies solely in the compilation phase, which shouldn't demand more than a minute or two of processing time.
Let's refine the Forgejo compose.yml file (from the previous Forgejo tutorial), now focusing on how to configure the Pages service. Examine the configuration below. (A static IP address for the main Forgejo server would be prudent; this is helpful for maintaining consistent connectivity with the subsequent Pages server.)
services:
  server:
    image: codeberg.org/forgejo/forgejo:15.0.3 # See https://codeberg.org/forgejo/-/packages/container/forgejo/versions to check the latest version
    # Modify the 'networks' section from the original Forgejo tutorial
    networks:
      forgejo:
        ipv4_address: 10.15.0.2
    ...

  pages:
    image: forgejo-pages:latest
    container_name: forgejo-pages
    ports:
      - "127.0.0.1:8080:8080"
    networks:
      forgejo:
        ipv4_address: 10.15.0.3
    command: ["serve", "-m", "-k", "<token>", -s, "http://10.15.0.2:3000", "--branch", "main"]

networks:
  ...
  forgejo:
    external: false
    ipam:
      config:
        - subnet: 10.15.0.0/24
          gateway: 10.15.0.1
In this case, the Forgejo server has been assigned a static IP address. This was added on to the original config from the previous Forgejo tutorial. In addition, the subnet and gateway corresponding to the Forgejo network were included.
The specific parameters "--branch", "main" (given in the command field) allow modification of the name of the branch which will be identified by the Pages server. The Pages server will only serve content located on that branch, the default name of which is pages-server. In the example configuration, the name has been changed to main.
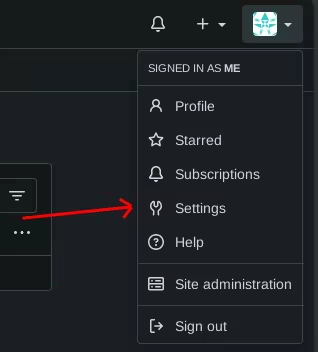
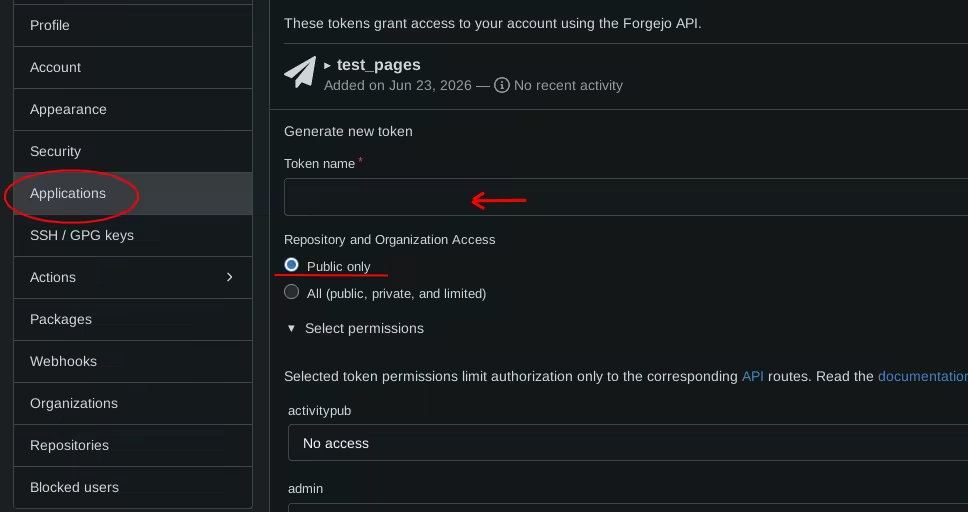
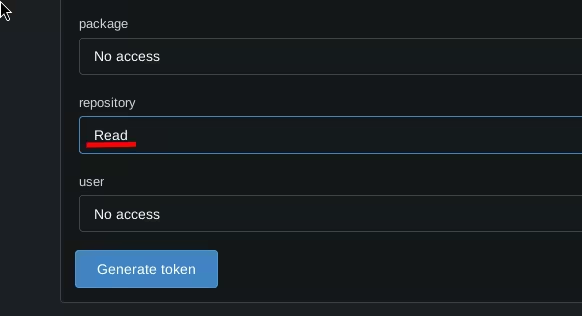
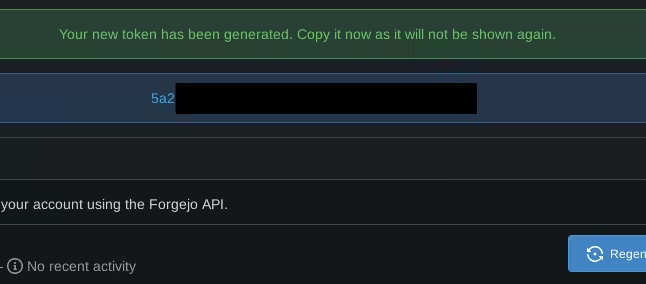
In place of \<token>, paste an access token issued by an administrative profile within the Forgejo instance. A token can be generated by proceeding to Settings, Applications, and then Generate Token. Name the token distinctly. Ensure the token can only access public repositories. Click the dropdown labeled "Select Permissions," and ensure the token has read access underneath the "repository" field.
Upon completion of the compose.yml, initiate the deployment of the container(s):
$ docker compose up -d
Again, it's required that the administrator put the Pages server into operation. With that accomplishment, the functionality will be available to all users of the instance.
Nginx configuration
Let's set up Nginx to enable access to the Pages server. With the second server{} block below, users' pages will be accessed in the format of: "username.githostname.onion/repo/path/to/file." If you choose not to use this configuration, you will use the third server{} block to access pages using "subdomain.githostname.onion/user/repo/path/to/file":
$ vim /etc/nginx/sites-available/forgejo-pages.conf
$ cat /etc/nginx/sites-available/forgejo-pages.conf
# The `server` block below is optional; if you have already set up
# your main Forgejo server without Nginx, then do not add this.
server {
    listen 80;
    server_name githostname.onion;
    location / {
        client_max_body_size 512M;
        proxy_pass http://127.0.0.1:3000;
    }
}


# You need to add this section in order for the aforementioned
# situation to be implemented.
server {
    listen 80;
    # The line below lets the pages be accessed in the
    # format: "username.githostname.onion/repo/file.html"
    server_name ~^(?<user>[^.]+)\.gitserverhostname\.onion$;
    location / {
        # 8080 is the port the Forgejo pages server is running on
        proxy_pass http://127.0.0.1:8080/$user$uri;
    }
}


# If you want to access the Pages server using the format
# of "githostname.onion/user/repo/path/to/file":
server {
    listen 80;
    server_name pages.githostname.onion;
    location / {
        proxy_pass http://127.0.0.1:8080;
    }
}

$ ln -sf /etc/nginx/sites-available/forgejo-pages.conf /etc/nginx/sites-enabled/forgejo-pages.conf
$ sudo nginx -t
$ sudo nginx -s reload
Of course, replace gitserverhostname.onion with your actual git server onion hostname. Secondly, your Tor config does not need to be modified, as long as it is pointing to the Nginx server.
That is all, in terms of configuration.
Testing it out
Log in to your Forgejo account, or create a new registrant on the Forgejo server. (Check out the instructions on how to allow users to self-register if needed. Currently, the configuration is DISABLE_REGISTRATION, underneath service, in the conf/app.ini file).
An example of creating a new user:
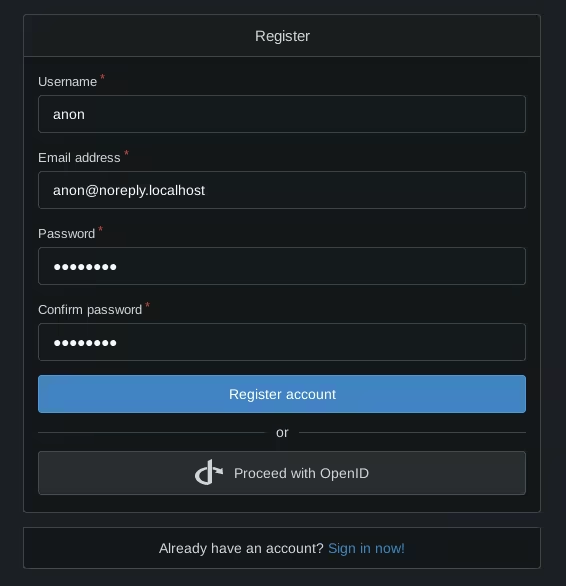
For showcasing purposes, we will now proceed to utilize the Nowhere Forgejo server and Pages server.
Create a new repository. In this example, it is called test-website.
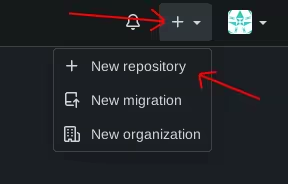
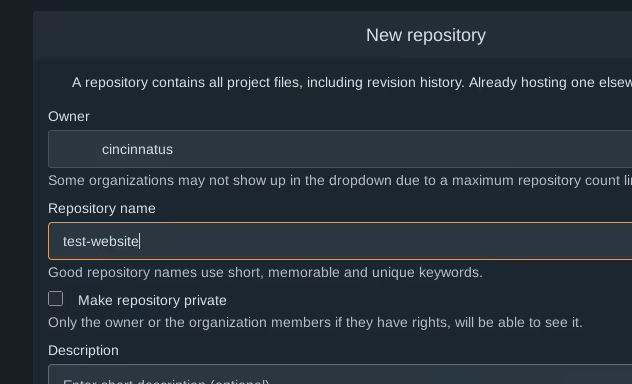
Clone the repository and create a simple website. Importantly, create a static-pages branch, unless the administrator has configured the pages server to look for a different branch name.
The Nowhere Forgejo Pages server has been configured to use the main branch.
$ git clone http://gdatura24gtdy23lxd7ht3xzx6mi7mdlkabpvuefhrjn4t5jduviw5ad.onion/cincinnatus/test-website.git
$ cd test-website
$ vim index.html
$ cat index.html
<html>
<head>Welcome to my website</head>
<body>
        <p>Welcome to my website, hosted by <b>Forgejo pages</b></p>
</body>
</html>
$ git branch -m main
$ git add index.html
$ git commit -m "initial commit"
$ git push origin main
...
In this case, the website can now be viewed by going to http://cincinnatus.gdatura24gtdy23lxd7ht3xzx6mi7mdlkabpvuefhrjn4t5jduviw5ad.onion/test-website/index.html:
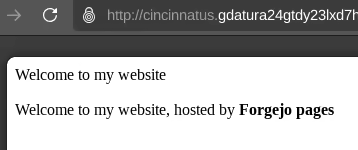
That concludes the tutorial.
 Suggest changes
 cincinnatus
 2026-07-01
 Donate XMR to the author:
8BMms91hmpvAiVMpg8jrEEP838Gvgi2qAECxZCVuaVRJAHBiNRZ3GKogefPcnmQtLWRXuSGeX4fyCCE4j5AVnnbw6WWSfn1